This chapter contains the following topics:
State Magnetic Media Reporting
This selection allows you to define state quarterly and annual electronic reports according to specifications provided by each state. Some states have mandatory electronic file reporting requirements for quarterly unemployment insurance reports and/or annual wage reports. If this is the case in your state, you need to use this selection to enter the formats for these reports.
Magnetic media formats is similar to, but more powerful than, the Quarterly reports formats described in the preceding chapter.
| • | Both types of formats are mechanisms by which you define the structure and appearance of a report: a printed report in the first case, or a report stored on tape or disk in the second case. |
| • | Once a format has been specified any number of reports can be printed from that format. |
| • | Both quarterly and annual reports can be printed on paper or generated in an electronic file. However, some states require complicated formats that are supported for electronic files but not for printed reports. |
| • | Electronic reports can, if desired, be printed out after being generated (using Magnetic media report list). |
| • | A line on the printed report corresponds to a record in the electronic file. Whereas the printed report has only three kinds of lines (header, employee, or total) the electronic report allows several different kinds of detail records. |
Records can be grouped and sorted according to some field in the record. Each such group can be preceded by a group header record and/or followed by a group total record.
Records can also be batched at arbitrary intervals (so many employees to a batch). Each such “batch” can be preceded by a header record (called an intermediate header record) and/or followed by an intermediate total record.
The general format for electronic report files typically consists of File Header records (in which employer information is reported), Employee detail records (used to report employees, their wages and other information, one record set per employee), and File total records. The different kinds of records (File header, Employee detail, File total) are called record classes.
Because this selection covers all states, record classes are provided as solutions to the problems presented by individual state rules and regulations.
The format for an electronic media report is defined by entering some general information about the report, using the General appearance option, and then entering specific layouts for each of the record classes included in the report, using the Record formats option. A record class can contain more than one record type. For example, many states base their formats on the Federal W-2 electronic report format, which uses three different record types for reporting employee detail. You would enter a record format for each of these record types. You can print a list of your report formats and their specifications using Format specifications.
After a report format is entered, it must be verified before it can be used. This is done with the Verify option. The Sample report option allows a sample electronic report file to be produced which can be viewed with a word processing program, text file viewer, or printed with the Magnetic media report list selection, which is accessed directly from the Reports, general main-menu selection.
The Copy option allows an existing format to be copied to a new one. This is useful when two report formats are almost the same and have only slight differences.
Use the Delete option to delete am electronic report format when it is no longer needed.
A format is sometimes called a layout.
For more information, refer to the State Magnetic Media Reports appendix.
|
Note |
Not all states require quarterly or annual electronic reports, but many states allow such reports without requiring them. |
Use this option to:
| • | Create a new format. |
| • | Assign a name and description to it. |
| • | Define its general characteristics, such as how long each record is, what record classes are included in the report, and what the record types are for each included record class. |
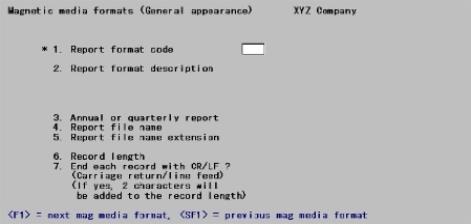
Select
General appearance from the Magnetic media formats menu.
The following screen displays:
From this screen you can work with new and existing formats. Enter the information as follows:
1. Report format code
Enter a code to identify this new or existing format. Each segment of the code is required. The first segment is intended to identify the state and the second segment to contain further identification such as the effective date or revision number. Neither segment is validated and any input is accepted.
Options
You can also use one of the options:
|
<F1> |
For the next existing format |
|
<SF1> |
For the previous format |
|
Format |
Two characters (first segment) 15 characters (second segment) |
|
Example |
Type XX and then type SAMPLE STATE |
2. Report format description
For a new format, enter up to four lines of description. For an existing format, the description displays automatically.
|
Format |
Four lines of 30 characters each |
|
Example |
Type Sample State and then press <Enter> On line 2, type Annual W-2 report On line 3, type Ref: On line 4, press <Enter> |
3. Annual or quarterly report or Report frequency
The field name changes based on the setting for Show state jurisdiction fields in Control information. If that field is checked then this displays as Report frequency, otherwise it is Annual or quarterly report.
If the field label is Annual or quarterly, enter A if this format is for an annual report (used by Annual reports (Mag media)), or Q if it is for a quarterly report (used by Quarterly reports (Mag media)). These reports are found under the main menu Reports, General.
If the field label is Report frequency, you have two additional options. You may also select M for Monthly reports (used by Monthly reports (Mag media)) and S for State quarterly reports (used by Quarterly reports (Mag media)). These reports are found under the main menu selection Reports, State.
Reports created for any of the selections can be printed using Magnetic media report list.
|
Format |
One letter, either A or Q If showing state jurisdiction fields, select one letter, either A, Q, M or S |
|
Example |
Type A |
4. Report file name and
5. Report file name extension
Enter the appropriate file name and extension for the electronic report file. For example, the Federal W-2 magnetic media report uses the file name W2REPORT. The file name to use is given in the reporting specifications provided to you by your state agency. The extension is usually blank.
|
Format |
Eight characters (for file name) Three characters (for extension) |
|
Example |
Type W2REPORT in Field #4 Press <Enter> in Field #5 |
6. Record length
Enter the record length for this electronic format file. All records output for the report have this length. The record length is given in the electronic reporting specifications provided to you by your state agency.
Record length does not include the optional CR/LF specified in the next field. If you answer Y to Field #7, the actual record length will be two characters longer than what you enter here. If you want a record length of 512 and you are select Y to field 7, enter 510 for the record length.
|
Format |
999 |
|
Example |
Type 128 |
7. End each record with CR/LF ?
(Carriage return/Line feed)
Answer Y to append carriage return and line feed characters (in that sequence) to the end of each record in the report file. Answer N to not append. The electronic reporting specifications provided to you by your state agency specify whether this is to be done or not.
|
Format |
One letter, either Y or N |
|
Example |
Type Y |
Field number to change ?
Options
Make any desired changes. For an existing entry, you can use one of the options:
|
<F1> |
For the next existing format |
|
<SF1> |
For the previous format |
Press <Enter> for the next entry screen, which displays as follows:
Enter the following information:
8. Employee names are entered
If you enter your employees’ names with the personal name first (e.g., “Martin van Buren”) in each employee record, enter F here. If you enter them with the surname first (e.g., “van Buren, Martin”), enter L here.
|
Format |
One letter, either F or L |
|
Example |
Type L |
9. File header records ?
10. Group header records ?
11. Intermediate header records ?
12. Employee records ?
13. Intermediate total records ?
14. Group total records ?
15. File total records ?
These fields let you select which record classes to include for this format. Consult the specifications provided to you by your state agency for which record classes you need. Generally, those records which appear only once at the beginning of the report file are in the file header class. Those that appear for each employee are in the employee class. Those that appear only once at the end of the report file are in the file total class.
If your state requires employee records to be grouped by a field (for example, plant number) you may need to include either or both the group header class and the group total class.
If your state requires intermediate totals after a specified number of employees have been reported, you need to include the intermediate total class.
The software will allow you to respond N to each of these fields, but a report with no classes at all is not meaningful.
Answer Y to include a record class, or N to exclude it from the report.
|
Format |
One letter for each field, either Y or N |
|
Example |
Include file header and total records.Include intermediate total records but exclude intermediate headers. Exclude group header records and group totals. Include employee detail records. |
16. Group ordered by field
If you have entered N for both Field #10 and Field #14, groups are not used and the report is ordered in straight employee-number sequence. This field then displays as Not applicable and cannot be entered.
Otherwise, this field is required (the software will allow you to leave it blank, but the resulting format cannot be verified).
Enter the number of the field to be used in grouping employees. Field numbers consist of two segments: a prefix EF or EX, followed by am arbitrary number. The prefix indicates whether this is a regular or extended field, respectively. All of these fields are in the Employees selection.
Upon entry of a valid field number, its name displays alongside.
Regular fields are listed in the State Magnetic Media Report FieldsAppendix of this manual. Extended fields are user-defined. You can view them via Define extended fields.
Options
To avoid looking up the field number, you can use one of the following options instead of entering a field number.
|
<F1> |
To display a list of employee fields |
|
<F2> |
To display a list of employee extended fields |
If you enter the first segment of the field number as EF, instead of entering the second segment you can use the option:
|
<F1> |
To display a list of employee fields |
If you enter the first segment of the field number as EX, instead of entering the second segment you can the option:
|
<F2> |
To display a list of employee extended fields |
If you choose to display a window of either the regular or the extended fields, all of the fields are displayed in a scrollable table, one column wide. The current field is highlighted. Use <Up>, <Down>, <PgUp>, <PgDn>, <Home>, and <End> to move to the desired field. Alternately, you can press # to enter a field number directly. The table will scroll to that point. Either way, when you have selected the desired field press <Enter> to select it.
|
Format |
Two characters, EF or EX (first segment)999 (second segment) |
|
Example |
(Does not occur in this example) |
17. Intermediate record frequency
If you have entered N for both Field #11 and Field #13, employees are not batched. This field then displays as Not applicable and cannot be entered.
Otherwise, this field is required (the software will allow you to leave it blank, but the resulting format cannot be verified). Enter how many employees there are in each batch.
If the number of employees is not an exact multiple of the frequency entered, one batch is necessarily a short batch. This is always the last batch on the file.
|
Format |
999 |
|
Example |
Type 41 |
Field number to change ?
Make any desired changes. Press <Enter> for the next entry screen:

Enter further information as follows:
18. File header
19. Group header
20. Intermediate header
21. Employee
22. Intermediate total
23. Group total
24. File total
These fields correspond respectively to Fields #9 through 15 on the previous screen. Record classes which are absent from this format (i.e., which were entered as N on the previous screen) appear as Not applicable on this screen and cannot be entered. Conversely, any record class which was entered as Y on the previous screen must have at least one record type defined for it on this screen.
The following fields allow up to ten record types to be named for each record class. The name for a record type can be up to three characters. These names are used as identifiers when adding record formats. When an electronic report file contains several different records, they are identified by codes which appear in the same place in each record. Each record uses a different code. For example, one of the Federal W-2 reports uses the following record identifiers:
|
File headers |
1A, 2A, 1B, 2B, 1E, 2E |
|
Employee |
1W, 2W, 3W, 1S, 2S |
|
Intermediate totals |
1I, 2I |
|
File totals |
1T, 2T, 1F |
To make an electronic report format easy to use, use the record identifiers as specified in your state’s electronic format as the names for the record types in the fields below.
Each record type you enter here must be subsequently be defined using the Record formats selection (otherwise the report format cannot be validated).
Record types should be entered in the order in which it is intended that they appear on the report. Two identically-named record types are not permitted within the same record class. This is legal (though not recommended) within different record classes. When it happens, each record type is distinct and must be defined separately.
Enter the names of the record types in each record class included in the electronic report format.
|
Format |
Three characters for each record type Up to ten record types for each record class.When finished entering types for a record class, press <Enter> at the next empty type field to proceed to the next class. |
|
Example |
For Field 18, type 1A, 1B, 1E, and then press <Enter> to go to Field #21 (Fields #19 and 20 are not applicable for this format). For Field #21, type 1W, 1S, and then press <Enter>. For Field #22, type 1I and then press <Enter>. Field #23 is not applicable for this format.For Field #24, type 1T, 1F, and then press <Enter>. |
Field number to change ?
Make any desired changes. Press <Enter> to complete the transaction.
Use this option to enter the formats for each record in the electronic report. First, you select which electronic report format to work with, and then you select the record class and record type whose format you want to enter or change.
Select
Record formats from the Magnetic media formats menu.
The following screen displays:
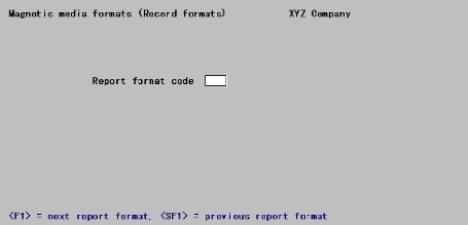
From this screen you can work only with existing formats. To create a new format, use the General appearance selection.
Enter the information as follows:
Report format code
Options
Enter the report format code you want to work with or use one of the options:
|
<F1> |
For next format |
|
<SF1> |
For previous format |
|
Format |
Two characters followed by 15 characters |
|
Example |
Type XX and then type SAMPLE STATE |
Upon selection of an existing format, the following screen displays:
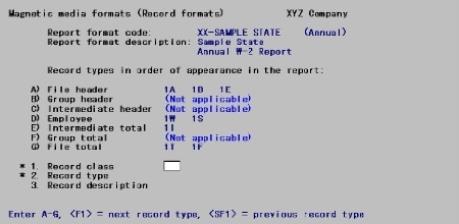
For each record class (lettered A) through G) on the screen), the record types already specified for this format in General appearance are listed. It will be recalled that there can be up to ten for each class.
From this screen you can work with both new and existing record types for this report format, provided that they are among the record types listed in A) through G) of the screen itself. There is one exception: If the General appearance selection has been utilized to eliminate a record type from the format after that record type has been defined in Record formats, that record type is accessible even though it does not appear on this screen. The only thing you can do with it after it has been accessed is to delete it.
Enter the information as follows:
* 1. Record class
Options
Enter a record class A through G (as shown in the above screen), or use the option:
|
<F1> |
For the next existing record format entry (of any class) |
|
<SF1> |
For the previous entry |
|
Format |
One letter from A to G |
|
Example |
Type A |
* 2. Record type
Options
Enter the name of a record type for the class entered above, or use the option:
|
<F1> |
For the next existing record format entry (of this class) |
|
<SF1> |
For the previous entry |
|
Format |
Three characters |
|
Example |
Type 1A |
3. Record description
Enter a description for this record format.
|
Format |
30 characters |
|
Example |
Type TRANSMITTER RECORD |
Field number to change ?
Options
Make any desired changes. For an existing entry, you can also use one of the options:
|
<F1> |
For the next existing record format entry (of any class) |
|
<SF1> |
For the previous entry |
|
<F3> |
To delete this entry |
Press <Enter> for the next entry screen:
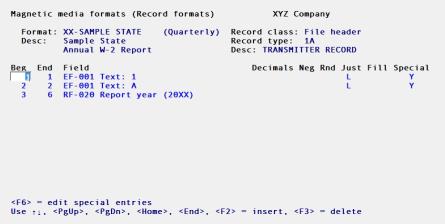
This is a scrollable screen containing a single row for each defined field in the record. Fields are in ascending sequence by their position. Fields cannot overlap each other, and the record length defined for this format in General appearance is the rightmost available location for any field. However, gaps may exist between fields. All fields are in straight ASCII format (you cannot define binary or packed-decimal fields).
Any field in either the employer or employee record (regular or extended) can be included in the record layout, as well as any predefined text.
Options
The current field is highlighted and can be changed. To move horizontally, press <Enter>. The cursor will move to the next field. Vertical movement is possible only when the cursor is in the leftmost column, in which case the options available are:
|
<Up>, <Down> |
Move to the previous or next line on the screen. Scrolling occurs when the top or bottom border is reached. |
|
<PgUp>, <PdDn> |
Move to the previous or next screen. |
|
<Home>, <End> |
Move to the first or last screen. |
|
<F2> |
Insert a new line at the current location. The existing line and all following lines will scroll down, leaving a blank line for your insertion. To cancel the insertion, press <Esc>. |
|
<F3> |
Delete the current line (the remainder of the screen will scroll up to close the gap). |
|
<F6> |
Change special entries for a field (applies only to fields that have special entries. These will be defined later in this section). |
Note that <Left> and <Right> are not active, and that <Up> and <Down> are active only when in the leftmost column. However, <Esc> is active in all columns — in the leftmost column it terminates screen entry and returns you to the previous screen, in any other column it cancels changes to this line and returns you to the leftmost column.
Enter information by column as follows:
Beg
Enter the beginning position of the field. This cannot exceed the record length and must be greater than the ending position of the preceding field if any.
|
Format |
999 |
|
Example |
Type 1 |
End
Enter the ending position in the field. This cannot exceed the record length, must be less than the beginning position of the next field if there is one, and must not be less than the beginning position of this field. The length of the field, as determined from its beginning and ending locations, cannot exceed fifty characters.
Be aware that it is permissible to define a receiving field smaller or larger than the defined size of the sending field. Truncation or padding will occur as required. Editing symbols (minus sign, decimal point) do occupy space, and you must allow for them when defining the beginning and ending positions.
|
Format |
999 |
|
Example |
Type 1 |
Field
Specify a code identifying what employee or employer information you want to put into this field. Field numbers consist of two segments:
Options
A prefix, which is one of the following:
|
EF |
Employee fields |
|
EX |
Extended employee fields |
|
RF |
Employer fields |
|
RX |
Extended employer fields |
|
JA |
RA jurisdiction fields |
|
JE |
RE jurisdiction fields |
An arbitrary number identifying the field.
Upon entry of a valid field number, its name displays alongside.
Regular fields are listed in the State Magnetic Media Report Fields Appendix of this documentation. Extended fields are user-defined. You can view them via Define extended fields.
Options
To avoid looking up the field number, you can use one of the following options instead of entering a field number:
|
<F1> |
To display a list of employee fields |
|
<Ctrl>+<F1> |
To display a list of employee extended fields |
|
<F2> |
To display a list of employer fields |
|
<Ctrl>+<F2> |
To display a list of employer extended fields |
|
<Enter> |
To include predefined constant text in the record layout. A window will appear to allow text entry. |
If you choose to display a window of either the regular or the extended fields, all of the fields are displayed in a scrollable table, one column wide. The current field is highlighted. Use <Up>, <Down>, <PgUp>, <PgDn>, <Home>, and <End> to move to the desired field. Alternately, you can press # to enter a field number directly. The table will scroll to that point. Either way, when you have selected the desired field press <Enter> to select it.
|
Format |
Two characters from the list above (first segment) 999 (second segment) |
|
Example |
Type EF and then type 1 |
If you enter the first segment of the field number explicitly, the cursor moves to the second segment and the option key corresponding to the prefix entered remains available. For example, if you type EF the cursor moves to the second segment and the <F1> option (but only that option) remains available.
Enter the number of decimal positions (digits to the right of the decimal point) to show in the report for a numeric field. The default is 2 decimals. Decimal positions are not entered for alphanumeric (character) fields or date fields.
|
Format |
A number from 0 to 5 |
|
Example |
(This field is skipped) |
Note that the positions to the left of the decimal are not entered because they are implied. The number of digits to the right of the decimal are subtracted from the size of the receiving field as determined by its beginning and ending locations. Any positions required for editing symbols (decimal point, minus sign) are also subtracted. Whatever is left over is what you have available to receive the integer portion of the sending field. No warning is issued when this remainder is smaller than the defined size of the sending field (nor indeed when it is zero or even negative).
Neg
Options
If the field selected can be negative, make one of the following selections for showing the minus sign of a negative number:
|
Blank |
do not show the minus sign |
|
R |
show the minus sign to the right of the number |
|
L |
show the minus sign to the left of the number |
Generally, states do not allow negative money amounts to be reported.
|
Format |
One character from the list above |
|
Example |
(This field is skipped) |
Rnd
Options
If the Decimals field is set to anything greater than zero, this field determines when the decimals are rounded. Select Y to round the decimals to the nearest dollar amount. Otherwise, select N to not do any rounding.
In most cases you will set this to N, but Louisiana requires this option set to Y.
|
Format |
Y = Yes and N = No |
|
Example |
This field is skipped |
Just
If the field selected is alphanumeric, enter L to justify the contents of the field to the left, R to justify the contents of the field to the right, or N for no justification. Here is an example, assuming that the sending field is six characters long and its current value is “bbXYbb” (where bb represents spaces):
|
Receiving field |
Result |
|
|
Size |
Justified |
|
|
6 |
N |
bbXYbb |
|
6 |
L |
XYbbbb |
|
6 |
R |
bbbbXY |
|
1 |
N |
b |
|
1 |
L |
X |
|
1 |
R |
Y |
|
Format |
One character from the list above |
|
Example |
Type L |
Fill
If the field selected is alphanumeric (character) and is justified to the right, enter S to fill the unused positions on the left with spaces (blanks), or Z to fill the unused positions on the left with zeros.
|
Format |
One letter, either S or Z |
|
Example |
(This field is skipped) |
Special
Special information is associated with certain fields. This information varies with the type of field, and cannot be represented in the simple row/column arrangement of this screen. When such information is present, a Y displays in this column. A special window displays to enter or change the data. Each of these windows is explained separately in the following sections.
If you want to change special entries for an existing line, you can use the <F6> option from the leftmost column. Alternately, you can press <Enter> repetitively until the Special column is reached, at which point the window will appear.
The special column can never be entered directly. A Y in this column does not imply that any (non blank) value has been specified for whatever special processing is available, nor is there any way you can change the Y to an N — the Y is merely there to inform you that a special window is in fact associated with this field type.
Entering Information in Special Entry Windows
This section explains how to enter information in different types of special entry windows.
Special entry windows: Text
This special entry window is displayed for the following field:
| • | EF-001 Any ** TEXT ** field. |
All text fields are numbered EF-001, but this is merely a convention and does not imply that they are all the same.
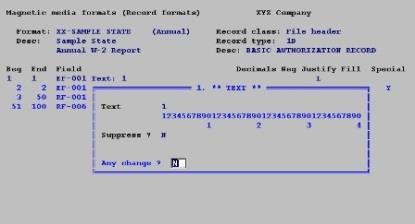
Text
Enter the text you want to appear in the electronic report in the position specified by Beg through End.
|
Format |
A number of characters (up to 40) equal to the length of this field, as shown by the beginning and ending position |
|
Example |
Type 1 |
Suppress
Answer N if you want the text to always appear in the report. Answer Y if you want to sometimes suppress the text. This feature would be used if a text field was intended as a caption for an adjacent field, and you wanted the caption not to appear when that field was not present.
Field #
This field displays only if the preceding field is Y.
Field number is selected exactly as described previously for the Field column on this screen, except that you cannot enter a text in here. It is not required that the field entered here be included elsewhere in this record layout (or anywhere else in this format).
Any change ?
Enter Y to re-enter the window, or Y to return to the main screen.
Special entry windows: zip code/SSN
This special entry window displays for the following employee fields:
| • | EF-018. ZIP code (- + last four digits) |
| • | EF-019. ZIP code (last four digits) |
| • | EF-023. Social security # (nine digits) |
| • | EF-024. Soc. sec. # (first three digits) |
| • | EF-025. Soc. sec. # (middle two digits) |
| • | EF-026. Soc. sec. # (last four digits) |
Fill text
Enter the text to replace the field shown in the title of the window when that field is not numeric. You might for instance force non-numeric (e.g., Canadian) postal codes to be recorded as asterisks. Usually the replacement (fill) text is blank.
|
Format |
A number of characters (up to 40) equal to the length of this field, as shown by the beginning and ending position |
|
Example |
(Does not occur in this example) |
Any change ?
Enter Y to re-enter the window, or Y to return to the main screen.
Special entry windows: FIPS numeric state code
This special entry window is displayed for the following fields:
| • | EF-021 FIPS numeric state code (emp) |
| • | RF-032 FIPS numeric state code (empr) |
The FIPS (Federal Information Processing Standard) state code is not stored in Employees. Instead the state/territory postal abbreviation is translated to a FIPS code as needed, using an internal table. The purpose of this window is to specify what substitute will be used when this translation fails (because of invalid state abbreviations in Employees, or because of new states admitted to the Union since the last Passport Business Solutions upgrade).
Fill text
Options
Enter the text to use when the state is not found in the table of FIPS numeric state codes, or use the option:
|
<F2> |
To use the state’s postal abbreviation as the fill text |
|
Format |
A number of characters (up to 40) equal to the length of this field, as shown by the beginning and ending position |
|
Example |
(Does not occur in this example) |
Any change ?
Enter Y to re-enter the window, or Y to return to the main screen.
Special entry windows: hire/termination dates
This special entry window is displayed for the following fields:
| • | EF-027 Hire date (MMDDYY) |
| • | EF-028 Hire date month (MM) |
| • | EF-029 Hire date day (DD) |
| • | EF-030 Hire date year (YY) |
| • | EF-035 Termination date (MMDDYY) |
| • | EF-036 Termination date month (MM) |
| • | EF-037 Termination date day (DD) |
| • | EF-038 Termination date year (YY) |
Hire and termination dates are not required fields when entering an employee record. This special entry field allows you to specify the text to use when the hire or termination date has not been entered.
Fill text
Enter the text to replace the hire or termination date shown in the title of the window when that field has not been entered. Usually this replacement (fill) text is blank.
|
Format |
A number of characters (up to 40) equal to the length of this field, as shown by the beginning and ending position |
|
Example |
(Does not occur in this example) |
Any change ?
Enter Y to re-enter the window, or Y to return to the main screen.
Special entry windows: hire/termination dates this quarter
This special entry window displays for the following fields:
| • | EF-031 Hire date if this quarter |
| • | EF-032 Hire date if this quarter (MM) |
| • | EF-033 Hire date if this quarter (DD) |
| • | EF-034 Hire date if this quarter (YY) |
| • | EF-039 Termination date if this qtr |
| • | EF-040 Term. date if this qtr (MM) |
| • | EF-041 Term. date if this qtr (DD) |
| • | EF-042 Term. date if this qtr (YY) |
Hire and termination dates are not required fields when entering an employee record. Additionally, the hire and termination dates cannot be in the period covered by the electronic report. This special entry field allows you to specify the text to use when the hire or termination date has not been entered or is not in the period covered by the report.
Fill text
Enter the text to replace the hire or termination date shown in the title of the window when that field has not been entered or is not covered by the period being reported. Usually this replacement (fill) text is blank.
|
Format |
A number of characters (up to 40) equal to the length of this field, as shown by the beginning and ending position |
|
Example |
(Does not occur in this example) |
Any change ?
Enter Y to re-enter the window, or Y to return to the main screen.
Special entry windows: was employed ?
This special entry window is displayed for the following fields:
| • | EF-049 Was employed ? (month 1) |
| • | EF-050 Was employed ? (month 2) |
| • | EF-051 Was employed ? (month 3) |
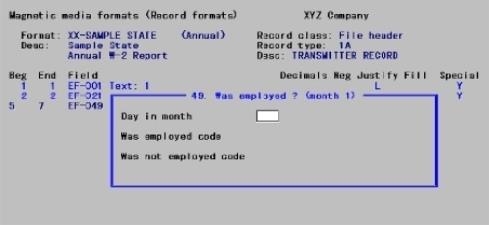
Employee Fields #49, 50, & 51 are for use on quarterly reports. They relate respectively to the first, second, and third month of the quarter, and let you specify whether an employee was employed or paid wages for each month of the quarter.
Date in month
Enter the date in the month used as a criterion for determining whether an employee worked or was paid wages for the month.
|
Format |
99 |
|
Example |
(Does not occur in this example) |
Was employed code
Enter the code specified by your state which indicates that an employee worked or was paid wages for the month.
|
Format |
A number of characters (up to 20) equal to the length of this field, as shown by the beginning and ending position |
|
Example |
(Does not occur in this example) |
Was not employed code
Enter the code specified by your state which indicates that an employee did not work and was not paid wages for the month.
|
Format |
A number of characters (up to 20) equal to the length of this field, as shown by the beginning and ending position |
|
Example |
(Does not occur in this example) |
Any change ?
Enter Y to re-enter the window, or Y to return to the main screen.
Special entry windows: W-2 box 6 check-marks
This special entry window is displayed for the following fields:
| • | EF-144 Statutory employee check-mark |
| • | EF-145 Deceased employee check-mark |
| • | EF-146 Pension plan check-mark |
| • | EF-147 Legal rep. check-mark |
| • | EF-148 942 employee check-mark |
| • | EF-149 Deferred comp. check-mark |
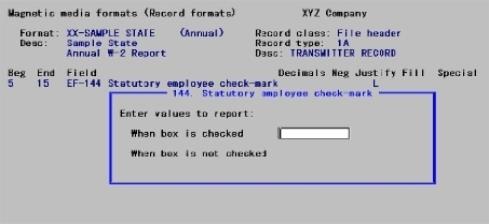
Employee Fields #144 - 149 are used to report the status of the check boxes on the Federal W-2 form (Box 6 check boxes). This special entry window is used to specify the values to report which indicate that a box has been checked or not checked.
When box is checked
Enter the code which indicates that the check-mark field shown in the window title is checked.
|
Format |
A number of characters (up to 20) equal to the length of this field, as shown by the beginning and ending position |
|
Example |
(Does not occur in this example) |
When box is not checked
Enter the code which indicates that the check-mark field shown in the window title is unchecked.
|
Format |
A number of characters (up to 20) equal to the length of this field, as shown by the beginning and ending position |
|
Example |
(Does not occur in this example) |
Any change ?
Enter Y to re-enter the window, or Y to return to the main screen.
Special entry windows: foreign address indicator
This special entry window is displayed for the following field:
| • | RF-012 Foreign address indicator |
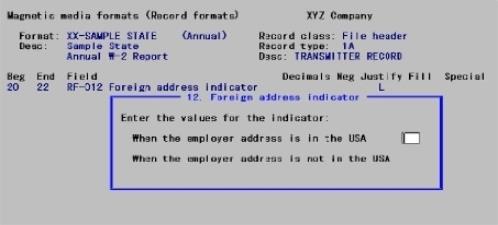
It allows you to specify the values that indicate whether the employer’s address is foreign or not. This field is used for the Federal W-2 electronic format and any state format that is based upon that format.
When employer address is in the USA
Enter the value which indicates that the employer’s address is not foreign.
|
Format |
One character |
|
Example |
(Does not occur in this example) |
When employer address is not in the USA
Enter the value which indicates that the employer’s address is foreign.
|
Format |
One character |
|
Example |
(Does not occur in this example) |
Any change ?
Enter Y to re-enter the window, or Y to return to the main screen.
Special entry windows: quarter letters
This special entry window is displayed for the following field:
| • | RF-025 Last month of quarter (letter) |
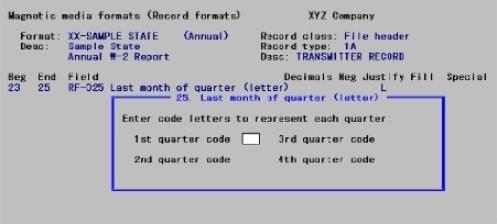
1st quarter code
Enter the letter which is used to represent the first quarter of the year.
|
Format |
One character |
|
Example |
(Does not occur in this example) |
2nd quarter code
Enter the letter which is used to represent the second quarter of the year.
|
Format |
One character |
|
Example |
(Does not occur in this example) |
3rd quarter code
Enter the letter which is used to represent the third quarter of the year.
|
Format |
One character |
|
Example |
(Does not occur in this example) |
4th quarter code
Enter the letter which is used to represent the fourth quarter of the year.
|
Format |
One character |
|
Example |
(Does not occur in this example) |
Any change ?
Enter Y to re-enter the window, or Y to return to the main screen.
Special entry windows: no workers / no wages indicator
This special entry window is displayed for the following field:
| • | RF-029 No workers/no wages indicator |
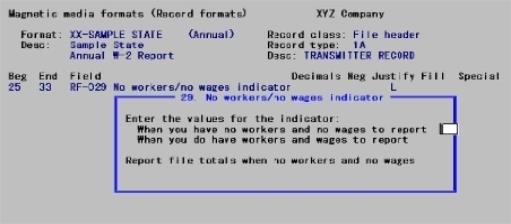
When making an electronic report (Quarterly or Annual), you are asked the following questions:
| • | Did you pay wages for this reporting period ? |
| • | Did you have workers for this reporting period ? |
If the answer to both of these questions is N, the first value entered in the window above is reported in the electronic report file. If the answer is Y to one or both of these questions, the second value entered in the window above is reported in the electronic report file.
When you have no workers or wages to report, no employee records, intermediate header or total records, or group header or total records are output. Additionally, you can specify to not output any file total records when you have no workers or wages to report by answering N for the third entry in the window above.
When you have no workers and no wages to report
Enter the code which indicates that you had no workers or wages for the reporting period.
|
Format |
One character |
|
Example |
(Does not occur in this example) |
When you do have workers or wages to report
Enter the code which indicates that you did have workers or wages for the reporting period.
|
Format |
One character |
|
Example |
(Does not occur in this example) |
Report file totals when no workers and no wages ?
Answer Y to report file totals when you have no workers and no wages for the reporting period. Answer N to not report file totals when you have no workers and no wages for the reporting period.
|
Format |
One letter, either Y or N |
|
Example |
(Does not occur in this example) |
Any change ?
Enter Y to re-enter the window, or Y to return to the main screen.
Special entry windows: extended date fields
This special entry window displays for:
| • | Any extended employee or employer date field. |
Select date format to use for this extended field
Options
Select which date format to use for this field. Your choices are:
|
1 |
YYMMDD |
|
4 |
YY (only) |
|
2 |
MMDDYY |
|
5 |
MM (only) |
|
3 |
DDMMYY |
|
6 |
DD (only) |
|
Format |
One digit from the list above |
|
Example |
(Does not occur in this example) |
Any change ?
Enter Y to re-enter the window, or Y to return to the main screen.
Special entry windows: employee report name sequence
This special entry window displays for the following field:
| • | RF-031 Employee report name sequence |
Some electronic format specifications need to know how employee names are reported, either as First name first or as Last name first. This field allows this information to be reported.
Employee names are reported First name first
Enter the code which indicates that employee names are reported as First name first.
|
Format |
One character |
|
Example |
(Does not occur in this example) |
Employee names are reported Last name first
Enter the code which indicates that employee names are reported as Last name first.
|
Format |
One character |
|
Example |
(Does not occur in this example) |
Any change ?
Enter Y to re-enter the window, or Y to return to the main screen.
Special entry windows: total employees covered by UI
This special entry window is displayed for the following fields:
| • | RF-033 Tot emp covered by UI month 1 |
| • | RF-034 Tot emp covered by UI month 2 |
| • | RF-035 Tot emp covered by UI month 3 |
Employer Fields #33, 34, and 35 are on quarterly reports and are not meaningful if used on annual reports. They refer respectively to the first through third month of the quarter, and let you to specify whether an employee was employed or paid wages for each month of the quarter.
Day in month
Enter the day in the month used as a criterion for determining whether an employee worked or was paid wages for the month.
|
Format |
99 |
|
Example |
(Does not occur in this example) |
Any change ?
Enter Y to re-enter the window, or Y to return to the main screen.
Use this option to print a full list of the exact specifications that define one or more electronic report formats. This is different from a sample report. A sample report shows what the report looks like. The format specification shows all the information you entered to get the report to look like that.
Select
Format specifications from the Magnetic media formats menu.
Enter the starting and ending codes for the report formats for which you want to print specifications.
Starting format code and
Ending format code
Enter the range of the formats you want to print. Follow the screen instructions.
|
Format |
999 |
|
Example |
Press <F2> at both fields for a range from first to last |
Use this option to verify a format before using it.
Select
Verify from the Magnetic media formats menu.
A screen displays, allowing you to enter the format code for the electronic report you want to verify.
Options
Use the following options.
|
<F1> |
For next format |
|
<SF1> |
For previous format |
After you have selected the report format to verify, the printer selection menu displays. On selecting a printer, the program begins checking the report format for errors.
As the format is verified, the following screen displays counts of errors and warnings found.
An error report prints at the end of the verification process. Under the column Error/warning, error messages are identified with an E and warning messages with a W.
You must correct errors before you can use a report format.
You can either correct warnings or leave them as they are.
Use this option to make a sample report from an electronic format.
|
Note |
You must verify and correct any errors in a report format before you can output a sample report. |
Select
Sample report from the Magnetic media formats menu.
A screen displays asking for the disk drive to which the sample report is to be written.
The sample report is written to this disk drive in its current directory. The file name of the sample report will be XXXXXXXX.SAM, where XXXXXXXX is the file name you entered in General appearance for the format.
After the sample report is finished, you are asked to remove the diskette from the drive.
Because the sample report is a text file, you can look at it with a program that displays a text file to the screen or you can use the selection Magnetic media report list on the Reports, general menu, to print the file.
If you have already created an electronic format that you want to keep, and you are going to add another similar format, use this option to copy the existing format. Then make changes to the copy.
Select
Copy from the Magnetic media formats menu.
A screen displays for you to enter the format code to copy from and the code to be assigned to the new format.
Enter the information as follows:
1. Copy from report format
Options
Enter the code of the format you want to copy from or use the option:
|
<F1> |
For next electronic format |
|
<SF1> |
For previous electronic format |
|
Format |
Two characters followed by 15 characters |
|
Example |
Type XX and then type SAMPLE STATE |
2. Copy to report format
Enter the code you want to assign to the new format. If you enter the code of a format already on file, you see an error message informing you of this and that you must delete the existing format first before you can use this format code.
Enter another format code that is not already used.
|
Format |
Two characters followed by 15 characters |
|
Example |
Type XX and then type SAMPLE STATE 1 |
3. Format description
Enter up to four lines of description of 30 characters each for the new format.
|
Format |
Four lines of 30 characters each |
|
Example |
Press <Enter> four times to accept the descriptions displayed |
4. Annual or quarterly
Enter A to specify that the copy to format is for an annual report, or Q to specify that it is for a quarterly report.
|
Format |
One character |
|
Example |
Type A |
Field number to change ?
When the format has been copied, press <Esc>.
Use this option to delete electronic formats which you no longer want to keep.
Select
Delete, from the Magnetic media formats menu.
Options
A screen displays for you to enter the format code to delete. Enter the code or use the option:
|
<F1> |
For next format |
|
<SF1> |
For previous format |
To delete a format, answer Y when you are asked whether it is OK to delete it. Otherwise, press <Enter> to keep it.
If you answer Y, a message displays stating that the format has been deleted. Press <Enter> and then select the code of another format to delete, or press <Esc>.
|
Format |
Two characters followed by 15 characters |
|
Example |
Type XX and then type SAMPLE STATE 1 |